When experimenting with the fonts I would draw guidelines as shown below, this enabled me to ensure that the letters were consistent tin many of their features: Width, height, where the centre lines were on letters such as 'E' and 'F' as it would look strange and unprofessional if these were not the same distance on each.
I decided that I really liked the fourth font that I created as it had a very gothic look to it which I thought was very unique. I had used the image below as an influence to create this, the details on the iron railings along with the spiralling, this inspired the curly formations of the font.
From the letters that I had experimented with I then created an entire alphabet, continuing to change and adapt the letters to how I felt best fit with how I wanted them to look. Some letters worked better than others, I particularly like the appearance of the letters 'A', 'I' and 'O' in this design.
Due to the amount of swirls and curves in the design I though it would be best to test it before taking it any further and correctly so, as once the font was formatted into any other word than the alphabet, the letters began to interfere with one another. I do really like this font and think that it would work really effectively for a title or something similar where the design focuses on a single word and time is spent arranging and altering the letters to fit together as a design. It is however, not very apt for what I am wanting to create.
I decided to work on the top font, and adapt it to make it more simple than in the initial sketch ups. I based this design on the divider in the image below. I really liked the shape of the stone piece and thought that it would provide a very strong foundation to provide the majority of forms in my font.
I sketched up each letter accordingly and then worked through it, adapting and changing the letter until I was happy with it, I then created a neat version at the end, adding any notes for myself to see when the letters had been scanned in. Below I have shown some of the letters in which I underwent this process.
Once I had completed the process of finalising each letter to the design I liked, I scanned the images in and separated each of the final letters to create an alphabet as shown below. Again leaving the notes on each of the letters so that I could use these when creating the final result of my font.
As with the other font there are a few letters which I prefer and others that didn't work as effectively as I had hoped. The important thing however is that the design is consistent throughout the whole font and it is evident that they are all part of the same design.
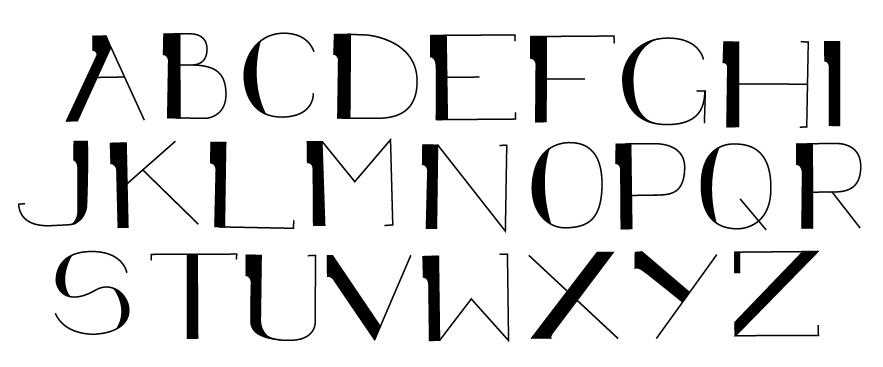
Once I was happy with the final designs I then rendered the font in illustrator, using the path tool to create a vectorised result for the designs and below I have included the finished alphabet that I have created. As you can see the font is very simplistic, providing a very readable result for the viewer, unlike the previous trial.
I then decided that I would create a test piece where I experimented with creating a variety words to make sure that I was happy with how the letters appeared alongside others.
Below I have included the final result and I am overall really happy with it, the font could well do with a few tweaks, such as the width of certain letters and the formation of some, but I think that it is a really effective and simplistic font.


